

JavaScript is the ultimate power tool in a web developer’s arsenal. It can also be their downfall.
With power comes anarchy and there is no worse time for it to occur than when you have coded your JS file only to find it fails to load.
Could it be a server issue and not a broken code?
There is only one easy way to find out. The hard way is to painfully inspect every character in your code. The easy route is to learn how to call JavaScript in HTML the right way.
Or just a better way.
How to call a JavaScript function in HTML
To call a JS function in HTML, use the script tag in the document body. Placing the script in the head section can degrade performance. Another way is to use the script source attribute (src) to call a JS file from an external source, either internal or a third-party hosted library.
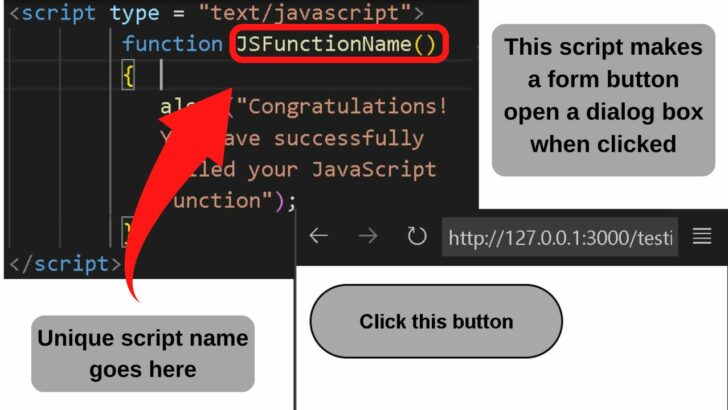
Step 1: Create your script
Your script needs a unique name to be able to call it up anywhere in your document.
The opening of all scripts must have the type declared using script type.
|
1 |
<script type = "text/javascript"> |
The next part is the function and this is where you name your script.
|
1 |
function JSFunctionNameHere() |
Last is the curly bracket to lead into your JS function to load on an event trigger. In this instance, the alert function is being used.
|
1 2 3 |
{ alert("Congratulations! You have successfully called your JavaScript Function"); } |
In its entirety, the script is…
|
1 2 3 4 5 |
<script type = "text/javascript"> function JSFunctionName() { alert("Congratulations! You have successfully called your JavaScript Function"); } </script> |
The script can be placed within the head or body section. The best practice is to place it as close to the closing body tag as possible.

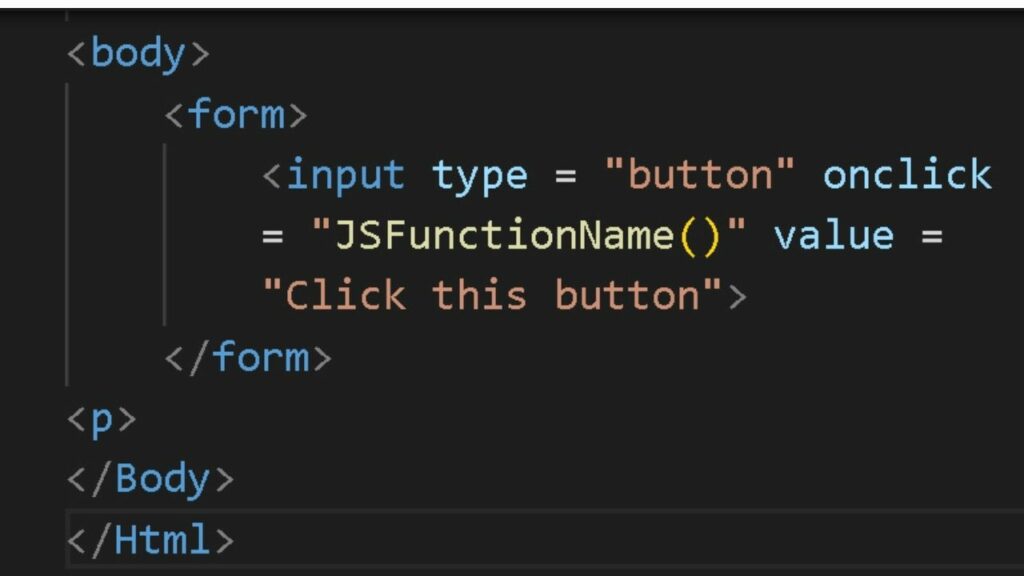
Step 2: Call the function in the HTML body
To call a JS function in HTML, add an event trigger, such as onclick. This requires user input to invoke JavaScript.
It requires a form, an input type, the name of the JS function to call, and a value, which is the message to display when the script runs.
|
1 2 3 |
<form> <input type = "button" onclick = "JSFunctionName()" value = "Click here for alternative methods to reach our team"> </form> |
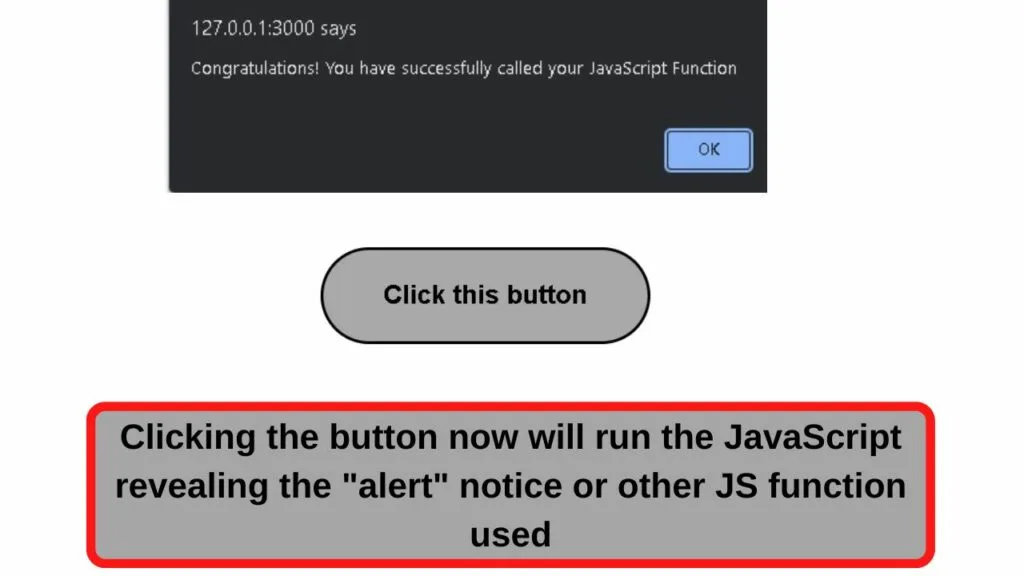
Step 3: Save and run the script
The last step is to save your file. Once saved, open the page in a browser window and click on the button to run the script.
All browsers have JavaScript Engines. Not all code editors do. If you are using a code editor and not seeing your JavaScript load, open the HTML page in a browser.

The above is the simplistic view to call a JS file. There are other ways. Namely, in the head section, linking to an internal JS file (on the same server), and linking to a third-party JS file, such as a hosted library.
Each method is explained below with the codes and screenshots, and if you would like to follow along, the codes for a demo project are included too.
A Fun and Easy JavaScript Project for Beginners
The result of the document outlined in the JS project below is a website maintenance page with a hyperlinked mailto address and all other contact details hidden within a submit button.
The core message is only visible along with a preferred method of contact. Other contact methods are available but hidden until revealed by the user.
Step 1: Download Visual Code Editor
If you would like to replicate this quick JavaScript and HTML project, VS Code can be downloaded from
code.visualstudio.com/download.
Step 2: Create a new HTML file
Click on “File” then select “New File”. Name it “index.html”.
You can name it something else if you want so long as it ends with the .HTML file extension.
Step 3: Start with a boilerplate HTML template
To load a boilerplate HTML template in VS Code, type an exclamation mark then press the tab key.
! then tab.

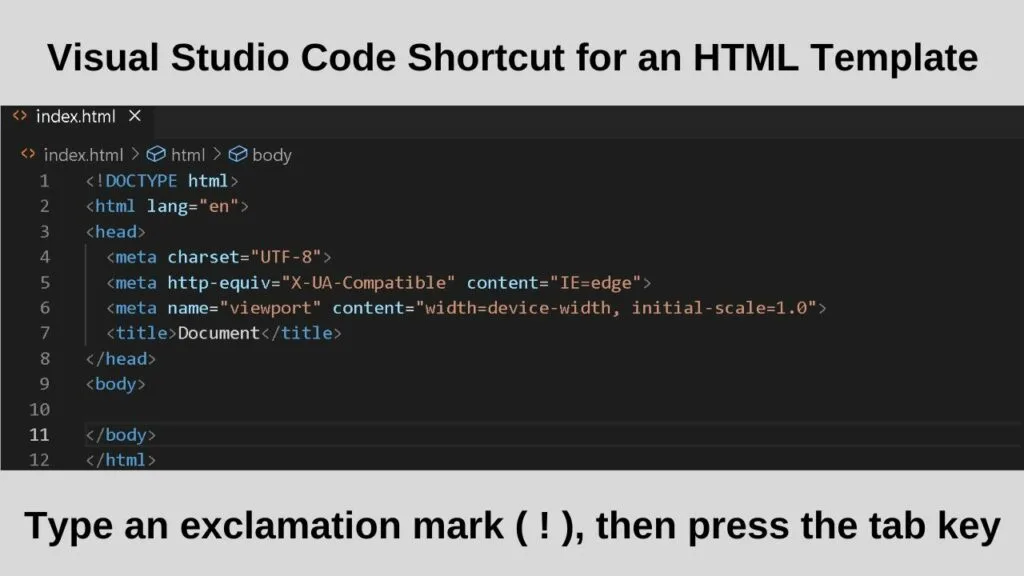
Replace the title with one unique for your project.
|
1 |
<title>Document</title> |
Step 4: Add “Style” tags
All that is left to add to this template are the style tags to be able to style your document with CSS syntax.
After the opening head tag, add your style tags.
That’s these…
|
1 2 |
<style> </style> |
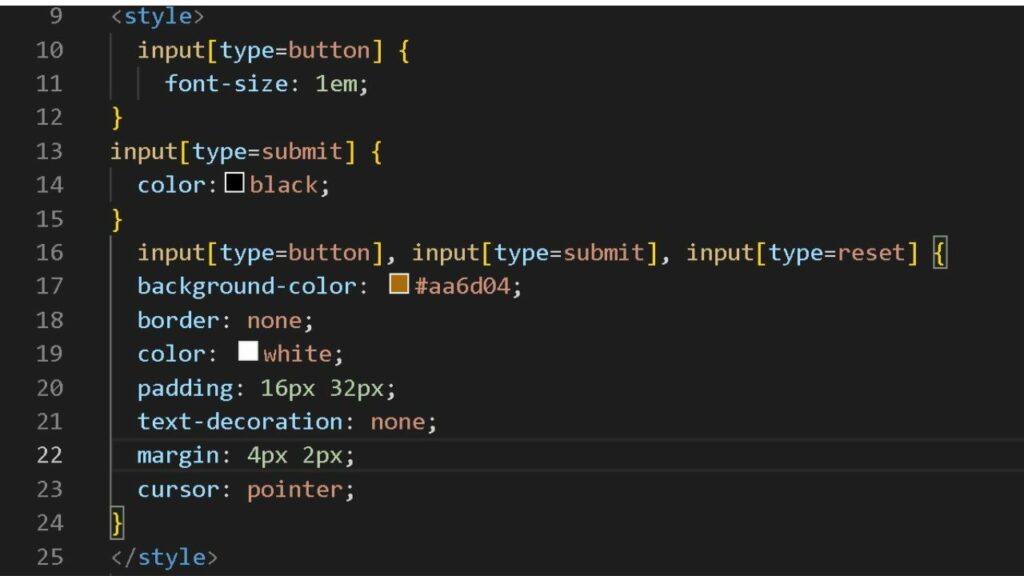
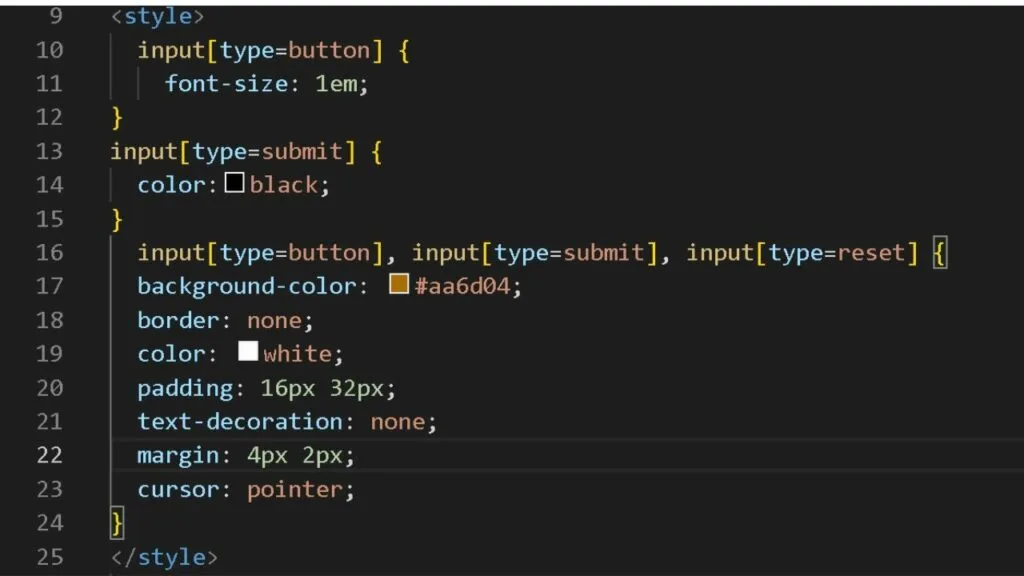
Step 5: Add CSS Syntax
Place the CSS syntax below between the opening style tag and the closing style tag.
|
1 2 3 4 5 6 7 8 9 10 11 12 13 14 15 16 17 18 19 20 21 22 23 24 |
<style> input[type=button] { font-size: 1em; } input[type=submit] { color:black; } input[type=button], input[type=submit], input[type=reset] { background-color: #aa6d04; border: none; color: white; padding: 16px 32px; text-decoration: none; margin: 4px 2px; cursor: pointer; } body { text-align: center; padding: 150px; } h1 { font-size: 50px; } body { font: 20px Helvetica, sans-serif; color: #333; } article { display: block; text-align: left; width: 650px; margin: 0 auto; } a { color: #0021dc; text-decoration: none; } a:hover { color: #333; text-decoration: none; } </style> |
Step 6: Add the script in the head section
To begin with, place the script before the closing head tag.
|
1 |
</head> |
This is not ideal. You will learn why, but for now, know that this code will be removed from the header and placed in the body section, or totally separated into its own js file.
|
1 2 3 4 5 6 |
<script type = "text/javascript"> function ModalNotification() { alert('Our customer support team can be reached by calling 000000000. \n\nPlease be advised that our phone lines are extremely busy.\n\nFor non-urgent support please use our social media channels\n\n Facebook.com/vanityURL; Twitter: @VanityURL;' ); } </script> |
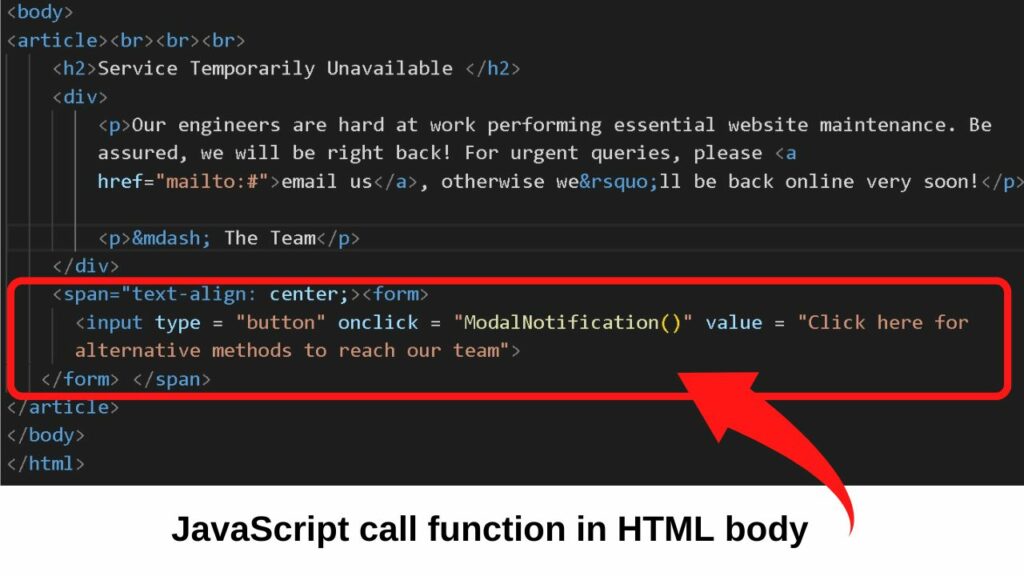
Step 7: Add the HTML to the body section
Add the HTML below. In this (HTML) section, the script is being called up using the “onclick” event handler.
|
1 2 3 4 5 6 7 8 9 10 11 12 13 14 |
<body> <article><br><br><br> <h2>Service Temporarily Unavailable </h2> <div> <p>Our engineers are hard at work performing essential website maintenance. Be assured, we will be right back! For urgent queries, please <a href="mailto:#">email us</a>, otherwise we’ll be back online very soon!</p> <p>— The Team</p> </div> <span="text-align: center;><form> <input type = "button" onclick = "ModalNotification()" value = "Click here for alternative methods to reach our team"> </form> </span> </article> </body> </html> |

The screenshot below illustrates the OnClick event after a user clicks the form button.
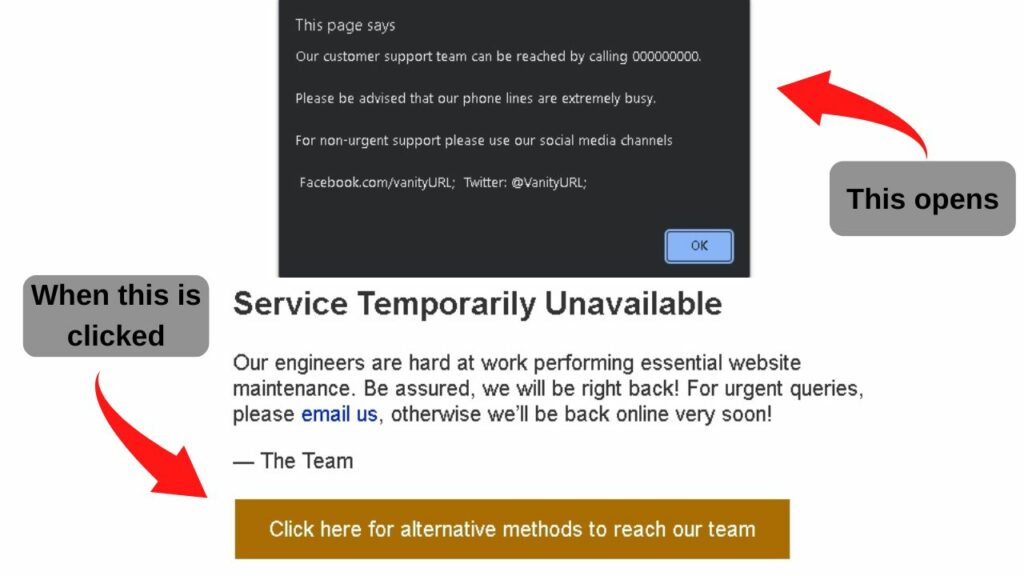
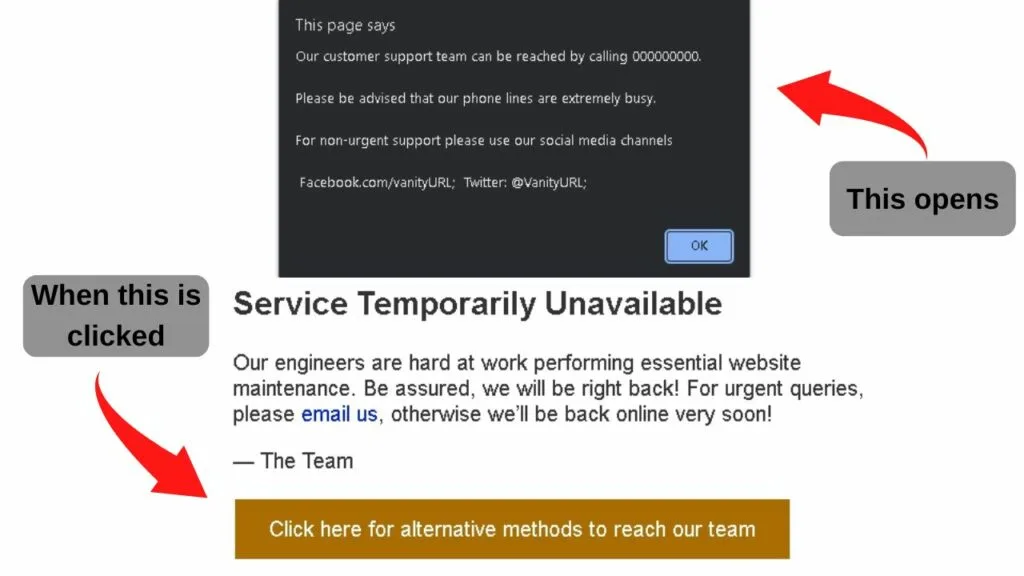
In the instance above, the JS script is loaded in the head section and then called up in the body section.
The downside to using this method is that the script will be executed by the browser before all of the HTML has been parsed. This can lead to a performance hit. Actually, in most cases, it will affect website performance. Particularly if you are executing more than one JavaScript function.
Call a JavaScript function in the HTML body section
A preferred option to call a JavaScript function in HTML is to add the script tag as close to the closing body tag as possible. There is a logical reason for it. The entire content of the page can load without executing the JavaScript function.
|
1 2 3 4 5 6 7 8 9 10 11 |
<form> <input type = "button" onclick = "ModalNotification()" value = "Click here for alternative methods to reach our team"> </form> </span> <script type = "text/javascript"> function ModalNotification() { alert('Our customer support team can be reached by calling 000000000. \n\nPlease be advised that our phone lines are extremely busy.\n\nFor non-urgent support please use our social media channels\n\n Facebook.com/vanityURL; Twitter: @VanityURL;' ); } </script> </article> </body> |
The script tag can be inserted before or after the JS call function, which in this case is the “onclick” element. In staying with the best practice in programming for Frontend Web Development, adding the script after the call function places the script tag closer to the closing body tag.
What is important at this point is placing the script tags within the body section.
If the script is inserted either after
|
1 |
</body> |
Or, after
|
1 |
</html> |
The HTML will fail to validate. What happens when the JavaScript is placed after the closing tag is the browser cannot find it. It results in a stray start tag because
|
1 |
<script> |
Is used to call a JavaScript function. If that function is not within the body section or the header section, the JS function cannot be loaded by the browser.
How Browers Parse Web Pages
As JavaScript can be called in HTML documents in the head or body section, it leaves the question of which method is best. To understand that, it is necessary to understand how browsers parse (load) web pages.
- HTML is the structure of the page and contains all of the data. It is a markup language. Not a programming language.
- JavaScript is a programming language. It can be used in back-end development and front-end development. Backend development is node.js. It is an entirely JavaScript environment. In frontend development, HTML, CSS, and JS are used.
Browsers parse all of the data in the order they appear in the source code.
Because data is parsed by browsers in the order they appear, the head section is not ideal. This will cause JavaScript functions to be executed by the browser before the body of the page has a chance to load.
Have you ever waited a while for a page to load, looked to the bottom left of the screen to see the message, “Waiting for ajax.googleapis.com”?
Putting the external script source attribute in the head section sends the browser off to download a library of codes. Not one script. A library!
When that happens, all a user will see is a blank screen until the JS functions load. After it has, the browser will then move on to the next block of HTML or JS.
It is for that reason that all HTML script tags be placed as close to the closing body tag as possible. This lets all of the content of the page load before scripts are executed.
Call a JS function in HTML by linking to an external JavaScript file.
Another way to call a JS function in HTML is to link to an external JavaScript file. This can be done within the head section or the body section. All that is required is the script tag with the source (src) attribute. The value to use for the source attribute is the file path to your .js file.
If you have been following along with this tutorial using VS code editor, or another program, you will have one file. Index.html.
Now, create a JS file. Do that by creating a new file and naming it with a .js file extension. This is the file extension for JavaScript files.
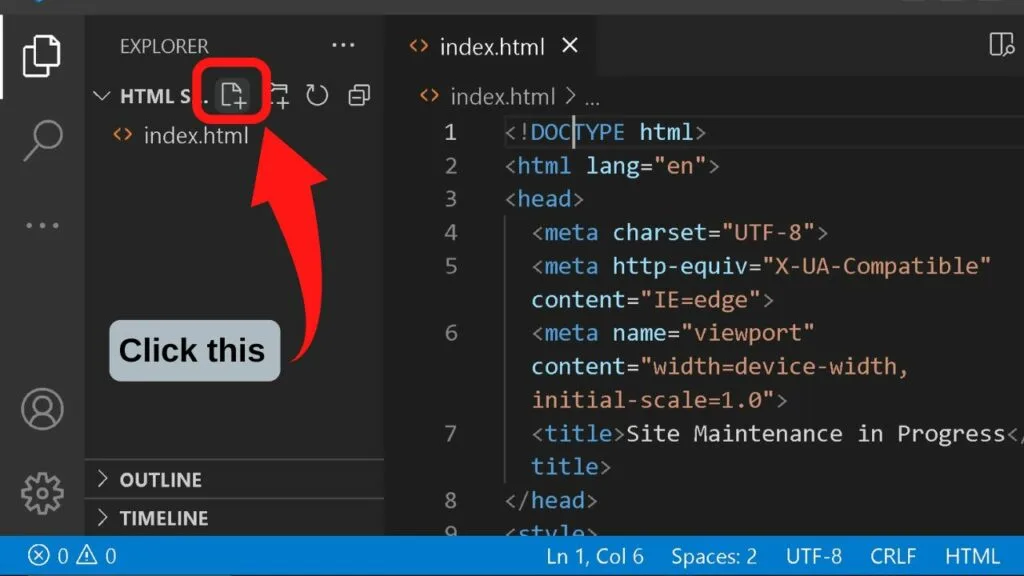
Step 1: Open a new file
In Visual Studio Code, the first icon beside your project folder (above index.html) is an icon to open a new file. Click on this.

Step 2: Name it with a .js file extension
The name ought to be something logical for others to understand its meaning. File names and file paths are used by others for troubleshooting.
It is this file that will contain all of the JS functions. Name it something along the lines of main.js.
Step 3: Insert your JS script without the script tags
When writing code in a JS file, the script tags cannot be included. Given it is a JavaScript file, you do need to include
|
1 |
<script> |
If you do, it will show an error. At least in a code editor with IntelliSense, it will. Without it, such as writing JavaScript in Notepad II, you would not know of a syntax error.

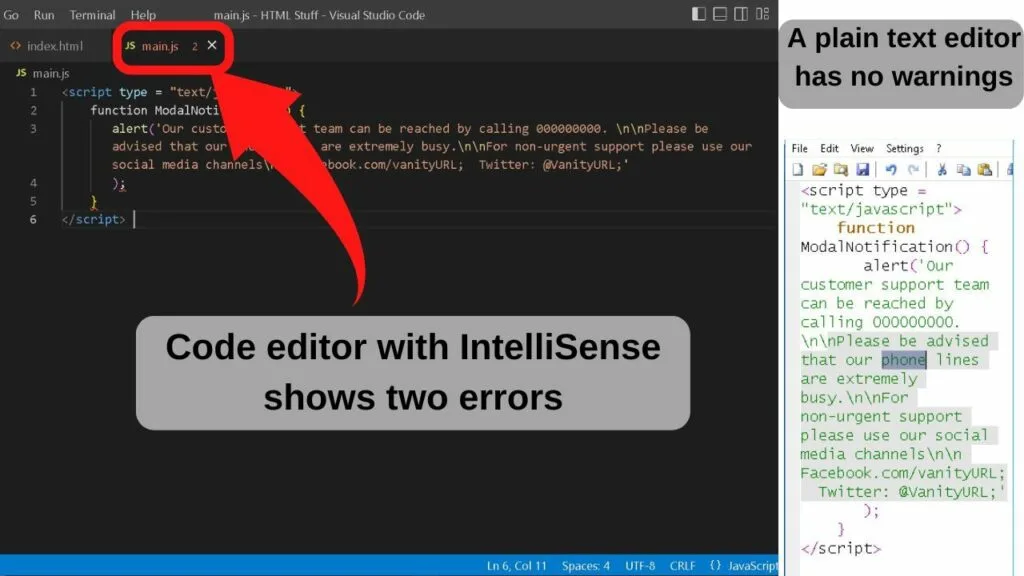
The script tag gets used in the HTML document to link to the JS source file.
Add your code to the .js file without the script tags.
|
1 2 3 4 |
function ModalNotification() { alert('Our customer support team can be reached by calling 000000000. \n\nPlease be advised that our phone lines are extremely busy.\n\nFor non-urgent support please use our social media channels\n\n Facebook.com/vanityURL; Twitter: @VanityURL;' ); } |
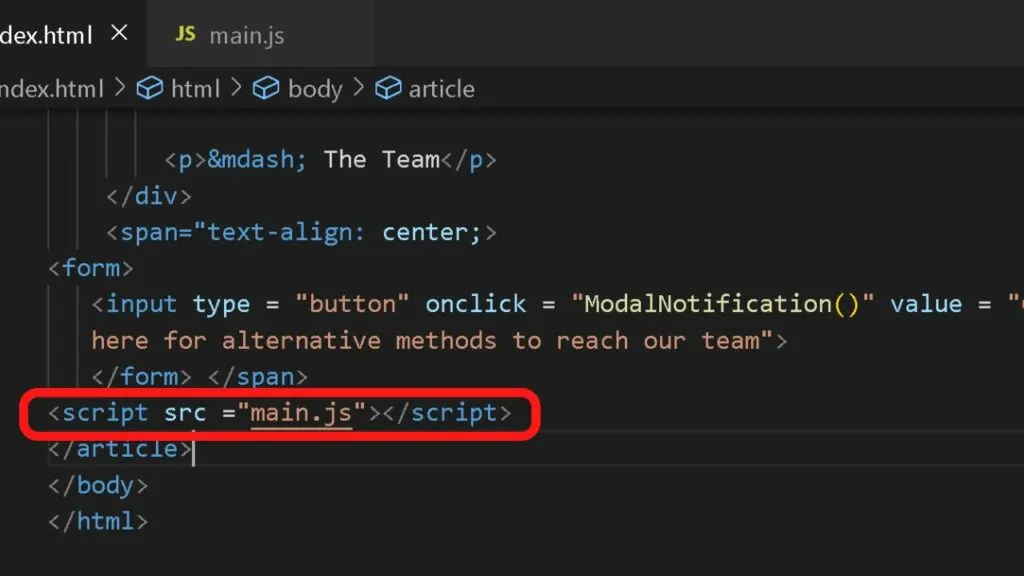
Step 4: Link the HTML to the JS file with the script src attribute
The script src (source) attribute is used to tell the browser where to find the JS file with the function to execute. It works the same as using the image src attribute to link to an image.
|
1 |
<script src ="main.js"></script> |
The script src attribute is added to the HTML document, either using the file path (filename.js) or the Relative file path, which is the full URL file path.

The big pitfall of using an external JavaScript file
There is one huge drawback to linking to an external JavaScript file in HTML documents and that is the additional HTTP request.
- Every image on a webpage has its own URL. A browser fetches the data from the linked asset, then loads it.
- The same happens when you link to an external CSS style sheet.
- Embed a video and that is another HTTP request to fetch it.
- Add in HTTP requests for JavaScript functions, your site performance can be degraded hugely.
If you decide to use an external js file, it will be worth testing your site performance. There can be a big difference in page load times when linking to an external js file rather than including the script on the same page. Preferably, near the body close tag.
The Benefits of Linking to an External JS File
It is not at all bad though because the big benefit comes from page-level caching. The external js files can be cached by the browser, and the server, preventing as many requests by loading the cache instead.
Where external linking to JS files excels is for repetition. If you want to use the same JS function across multiple pages, a JS file will be a time saver. Without it, you would have to insert the Script function and call it rather than simply typing the path using the script src attribute.
It is also possible to use the script source attribute to link to third-party JavaScript files.
How to link to an external JS file in HTML (or a hosted library)
Using the script source attribute is common practice among developers to link to sources such as a jquery library. The reasoning is that is simpler to link to hosted libraries, the most popular of which is by using the Google APIs service.
|
1 |
<script src="https://ajax.googleapis.com/ajax/libs/jquery/3.6.1/jquery.min.js"> |
When linking to hosted JS libraries, caching will be essential because entire libraries will be downloaded before the JS functions can be called.
The upside is the automatic updates because the library is managed by a third party. The downside is the hit on page load time.