
The coordinates of an image in HTML are a must-have to be able to create multiple links within a single image.
An image map cannot be made without them.
On a website, there are far better ways to display images side by side in HTML, however, it does require bouncing between HTML and CSS.
If you want to stick with pure HTML, that can absolutely be done.
All you need is the URL or file path to the image, the area shape defined, and the coordinates for the invisible shape to be rendered by the browser.
Getting the image coordinates is the trickiest bit, but with practice, you can have the process done in minutes.
How to find coordinates of an image in HTML
The coordinates of an image can be found using an online image map generator, or with software programs such as Paint, or Gimp. Image coordinates are displayed on the bottom left of the screen indicating the coordinates for the x and y position. Using Gimp, you can open a pointer dialogue box too.
What are image coordinates in HTML and how are they used
The coordinates of images in HTML are used by browsers (and some email clients) to define specific areas within an image.
Coordinates are applied to image maps with the “coords” attributes
|
1 |
Coords=”#,#,#,#,”> |
When used in a map tag, the x numbers are the first and third.
The second and fourth digits are for the vertical axis. The equation used is x1,y1,x2,y2.
The values to specify are the positions on the x and y-axis.
The x-axis is the horizontal position and the y axis the vertical position.
In simpler terms…
- The x position is the number of pixels from the left of the image.
- The y position is the number of pixels down from the top of the image.
There are a couple of simple and efficient methods that you can use to find the coordinates of any location in an image.
1. Use an online image map generator to find image coordinates in HTML
Step 1: Go to image-map[.net] or an alternative image map generator
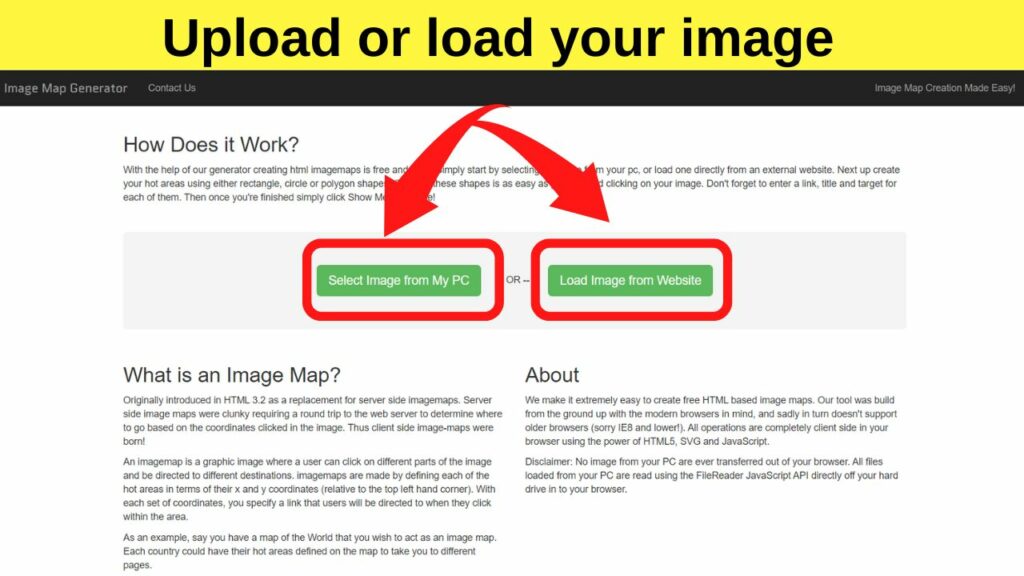

Online image map generators make finding coordinates simple.
Upload the image you want coordinates for, or if it is already online, you can load the image from the website by typing or pasting in the full URL of the image.
Step 2: Mark your hotspots

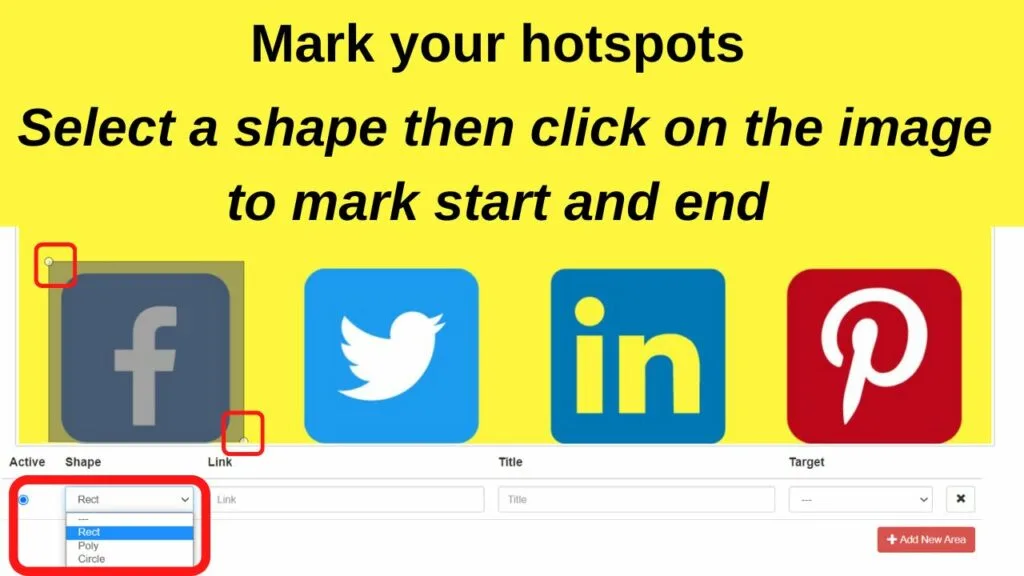
Hotspots are created by drawing shapes around the areas of an image map that you want to be clickable.
Shapes can be rectangles (rect), circles (circle), or polygon (poly).
The poly option is what to use for accuracy around difficult-to-define shapes.
Using image-map.net, select the shape first below the image, then click once to mark the starting point, then again at the endpoint.
Different online image map generators may use different functions, but all will follow a similar process.
There are only three shapes available for image mapping in HTML and all of them require coordinates.
The area that has been marked as a hotspot will show as an overlay. Everything within the darkened area is the hotspot that can be linked using the href attribute.
Click on “Add new area” to create as many map areas as you need.
Step 3: Set the link destinations and behavior
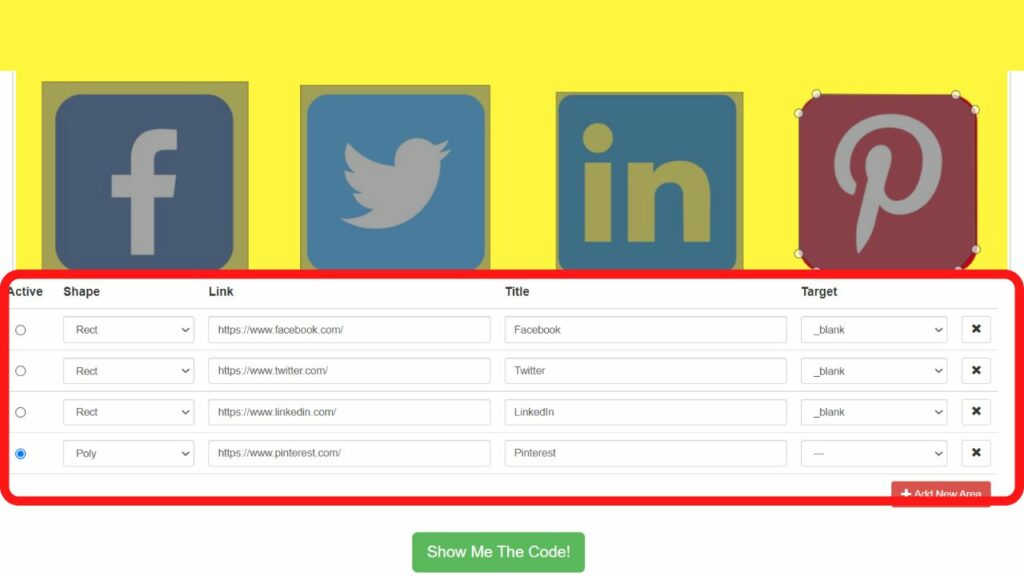
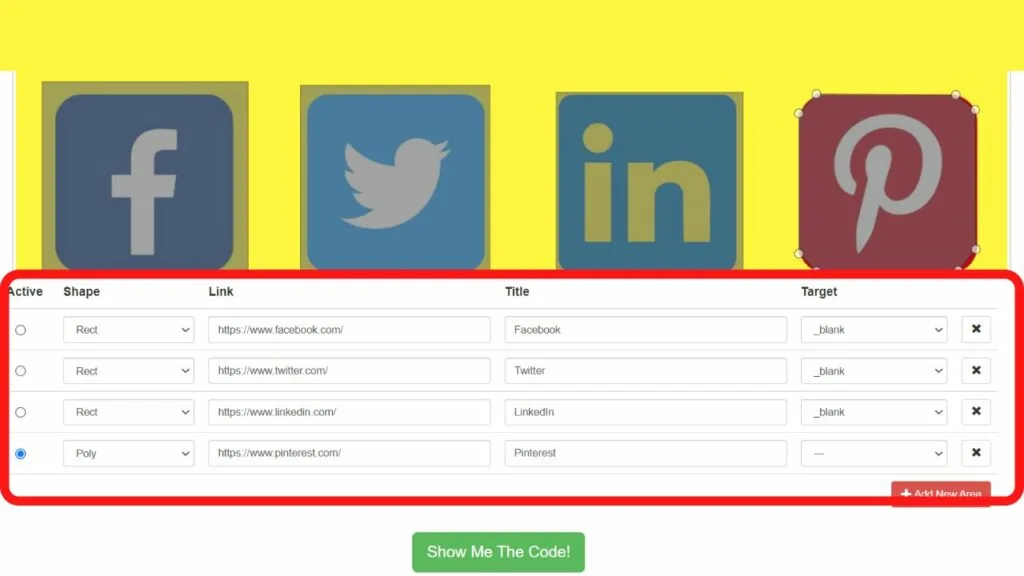
Below the image is where you set the link destination, give it a title, alt attribute, and declare whether you want to open the link in a new tab or the same tab.
Step 4: Show and swipe the code
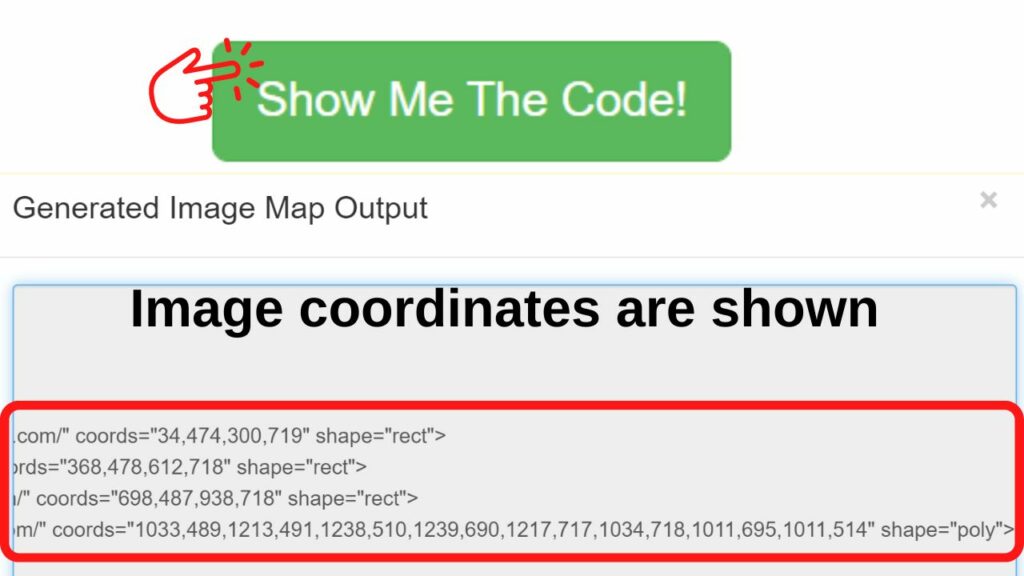

Once your hotspots are marked, click on the button that has “Show me the code”. This is where you will find the image coordinates in the HTML code generated.
A modal pops up with the “Generated Image Map Output”.
The coords are the image map coordinates for each specified area.
2. Use an image editing tool to find image coordinates in HTML
Step 1: Open an image editing tool on your computer

Most Graphic Editing software programs have tools that show the coordinates of images in the bottom left corner, much like hovering a link in a browser displays the link destination on the bottom left.
On Windows machines, the Paint app can show the coordinates, or Gimp can do the same on Windows and macOS.
For the purposes of this tutorial, Gimp is being used because there is a feature in it that makes it clearer, and easier to get coordinates accurately.
Step 2: Open your image

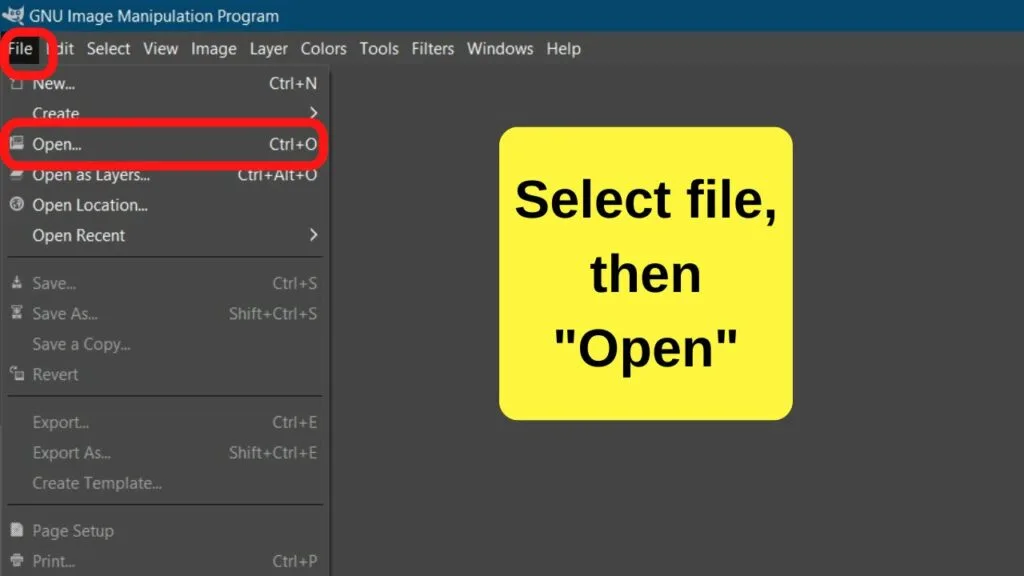
Click on the file menu and select “Open” and then find the image on your computer to open within the program.
Step 3: Open the pointer dialogue (optional but easier)

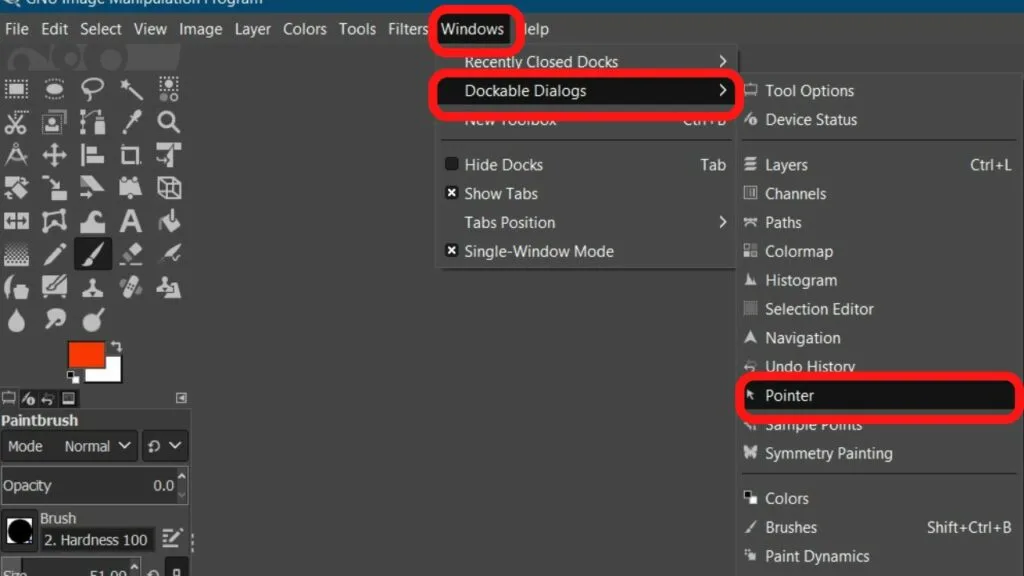
In Gimp, there is a dialogue box you can have open to constantly show the x and y position of the pointer.
Click on Windows > Dialogue boxes > Pointer.
This pops the pointer dialogue box into the right of your image editing pane letting you see at a glance a bunch of information for any point in the image that you hover the mouse on.
The dialogue box can be expanded. If you find the numbers on the bottom left too small to read, definitely use the pointer dialogue box.
Step 4: Move your cursor to find the coordinates in the image

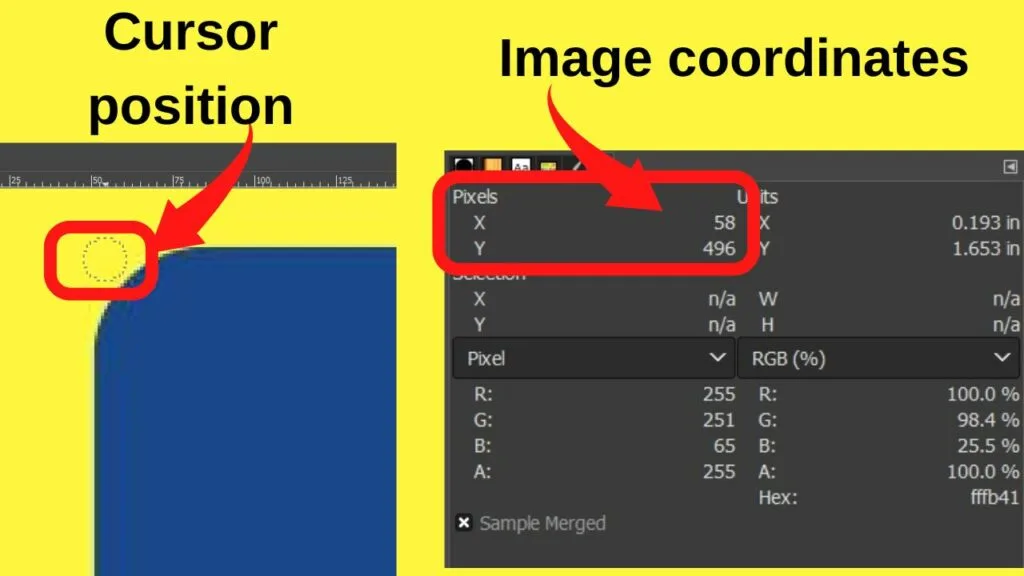
With the dialogue box open on the right of your screen, the coordinates always show the position of your cursor.
For pinpoint accuracy, zoom in on the area that you want to define and then hover the mouse pointer.
Jot down the coordinates that show in the pointer dialogue box.
If you have not enabled the pointer dialogue box or are using a different program, look at the bottom left of the screen.
You should see two numbers that change each time you move your mouse.
That is the x and y coordinates that identify the area where your pointer is hovering.
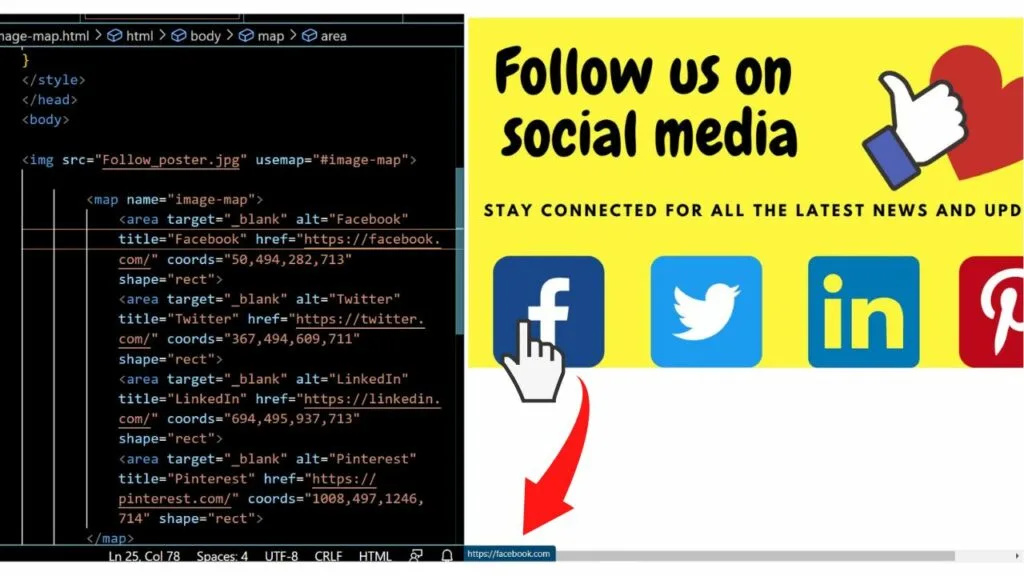
Putting your image coordinates into action
Remember that the image coordinates are only part of the equation. When marking up your image HTML code, three attributes are required.
The map name, area, and coordinates.
The image is inserted first using the image HTML tag, followed by the “usemap” attribute. The area shape and coordinates are specified within the image map.
The complete HTML markup with the image coordinates would be along the lines of…
|
1 2 3 4 5 6 7 8 |
<img src="Follow_poster.jpg" usemap="#image-map"> <map name="image-map"> <area target="_blank" alt="Facebook" title="Facebook" href="https://facebook.com/" coords="50,494,282,713" shape="rect"> <area target="_blank" alt="Twitter" title="Twitter" href="https://twitter.com/" coords="367,494,609,711" shape="rect"> <area target="_blank" alt="LinkedIn" title="LinkedIn" href="https://linkedin.com/" coords="694,495,937,713" shape="rect"> <area target="_blank" alt="Pinterest" title="Pinterest" href="https://pinterest.com/" coords="1008,497,1246,714" shape="rect"> </map> |
The above creates a single image with four clickable areas.