

Rarely will any HTML website be a single page. User experience is enhanced when websites are made with multiple pages.
The process is straightforward. The trickiest part is linking multiple HTML pages together. For linking to be effective, it helps to keep all of your files organized within a single folder.
Follow the steps below to make multiple pages in HTML and link them together in a navigation menu.
How to make multiple pages in HTML
- Create a folder to house all of the pages
- Show the “file name extensions” in the view tab
- Create each of your HTML files in the folder (as *.html and NOT *.html.txt)
- Open each page in a plain text or source-code editor
- Link all of your pages together in a navigation menu
Step 1: Create a folder to house all of the pages

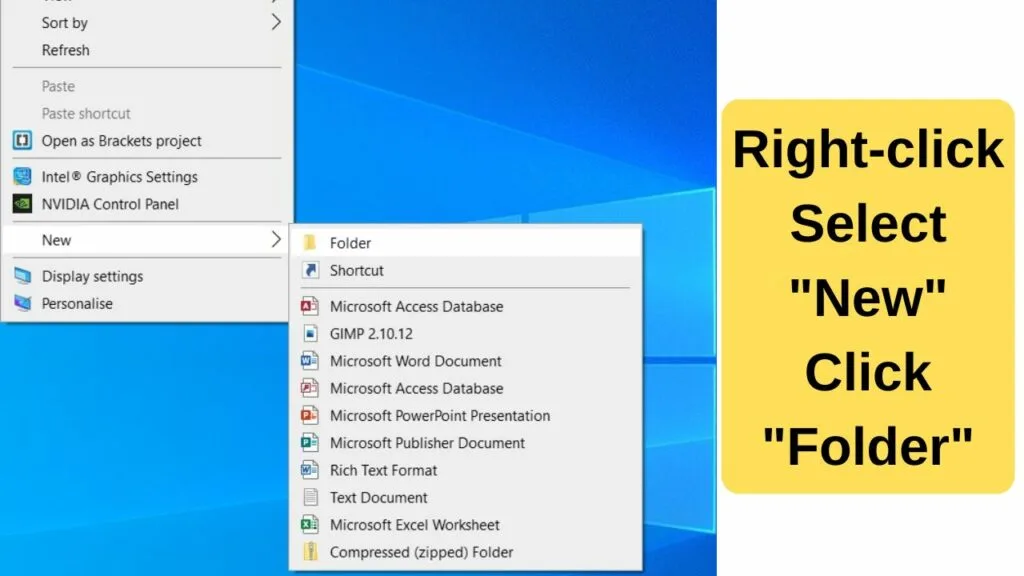
This will be the home for all of your project files. The HTML pages, style sheet, images, and JavaScript.
To make things easy to remember, name it something convenient for the project that you are working on.
The folder name is important because when you link to multiple pages in HTML, the full file path to the folder is required.
By having them in different folders, the file paths would need to be changed. It is much simpler to link to multiple pages in HTML when each page is in a unique folder for the project/website.
Folders can be nested so you can have your HTML pages in the parent folder, then have images and JavaScript folders nested within it.
Step 2. Show the “file name extensions” in the view tab
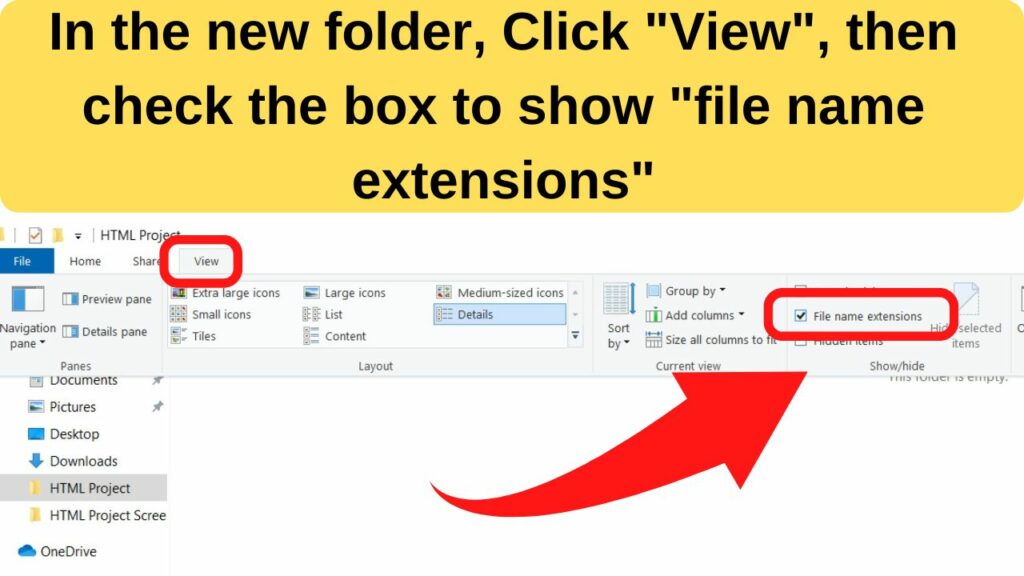
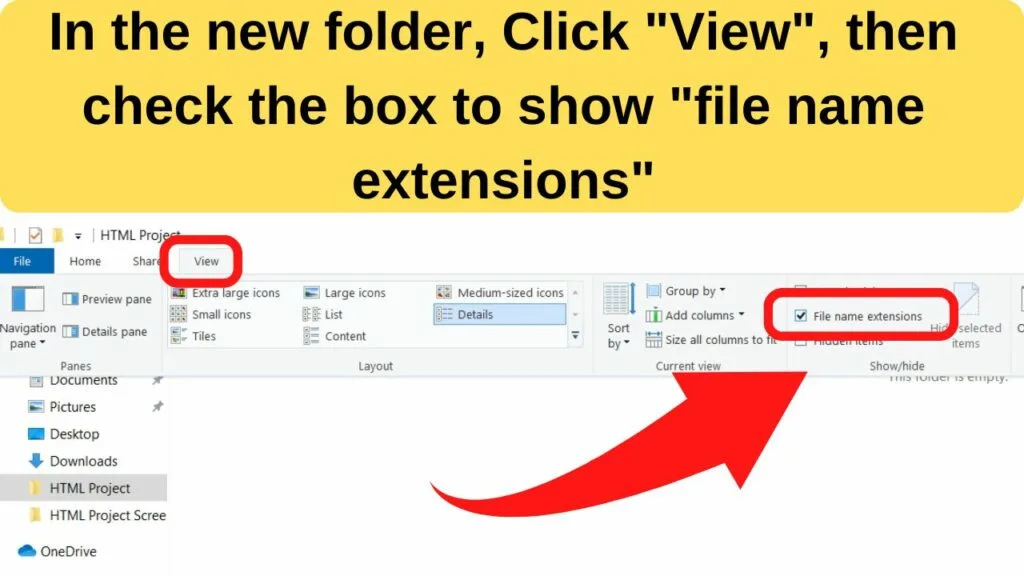
For Windows users, you need to be able to see the file name extensions to be able to change it.
When you create a new text document, the system default is to add the *.txt to the file extension name.
If you cannot see the file name extensions, Windows will automatically add the .txt extension to your .html file name resulting in a file name structure of *.html.txt file.
That will not open in a browser. Instead, it will open in a plain text editor.
You need the HTML file extension without the *.txt at the end. To be able to create *.html pages without the *.txt extension, open a folder, click on the “view” tab, then check the box beside “file name extensions”.
With this enabled, when you create a new text document, you can change “New Text Document (.txt) to a .html file without the .txt extension being added.
Step 3. Create each of your HTML files in the folder


Once you have your folder created, next is to make all of the pages that will be required.
If you have already made multiple HTML pages and now want to link those together, put each of your files into the one folder.
Every new HTML page will go into this folder containing all of the HTML files.
Depending on the complexity of your project, such as if you plan to use JavaScript, CSS, jQuery, attachments such as images and audio, it may help to create a website folder, and have a folder for “pages” that contain all of your HTML pages.
For demonstration purposes, the page names listed below are being used to create a fictional multipage html website.
- Index.html
- About-us.html
- Contact.html
- Services.html
- Resources.html
For this, you can either create complete web files, or create the html pages to markup in HTML later.
For speed, the fastest method is to dump blank files into the project folder to edit later.
Right-click > New > Text Document
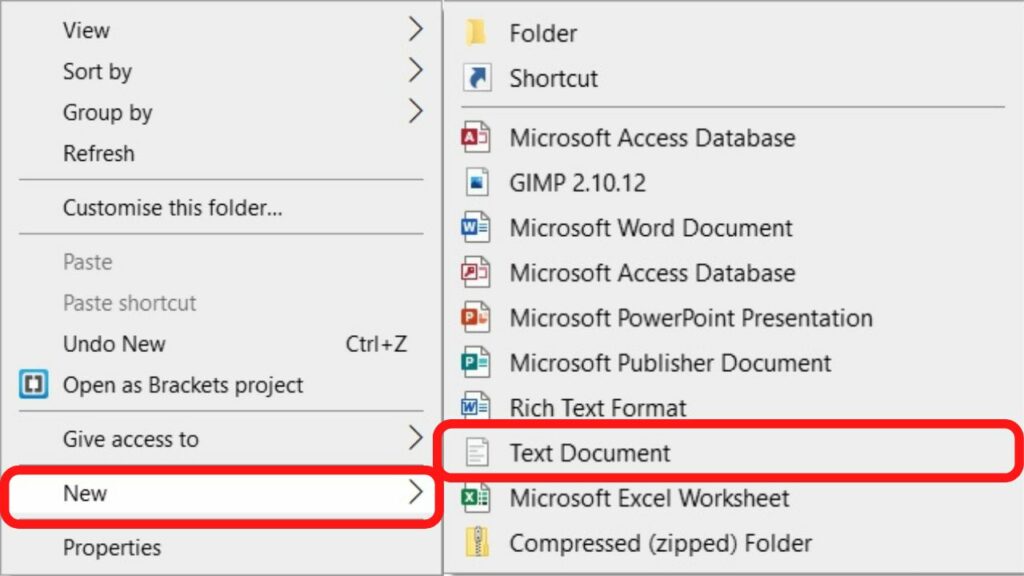
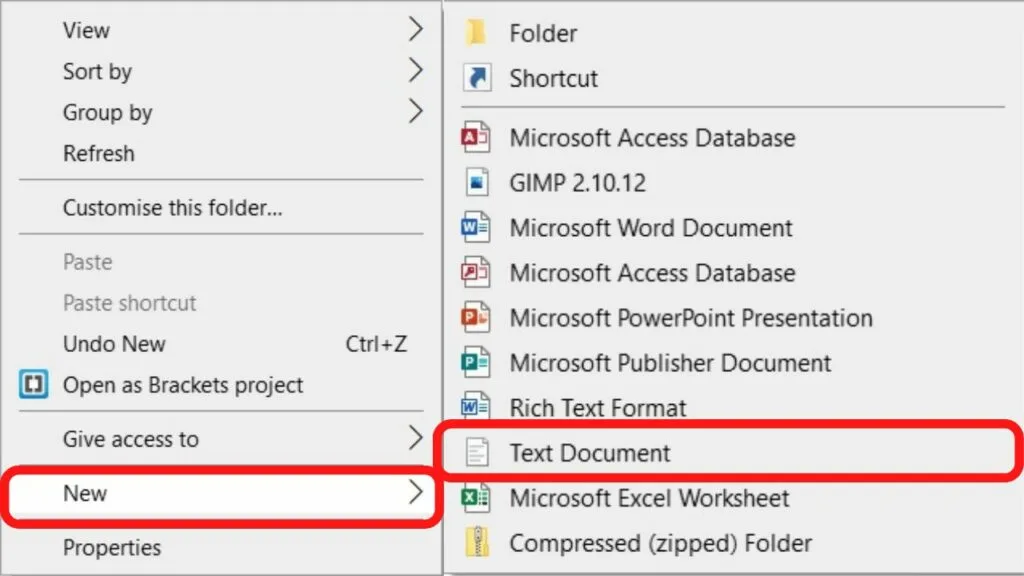
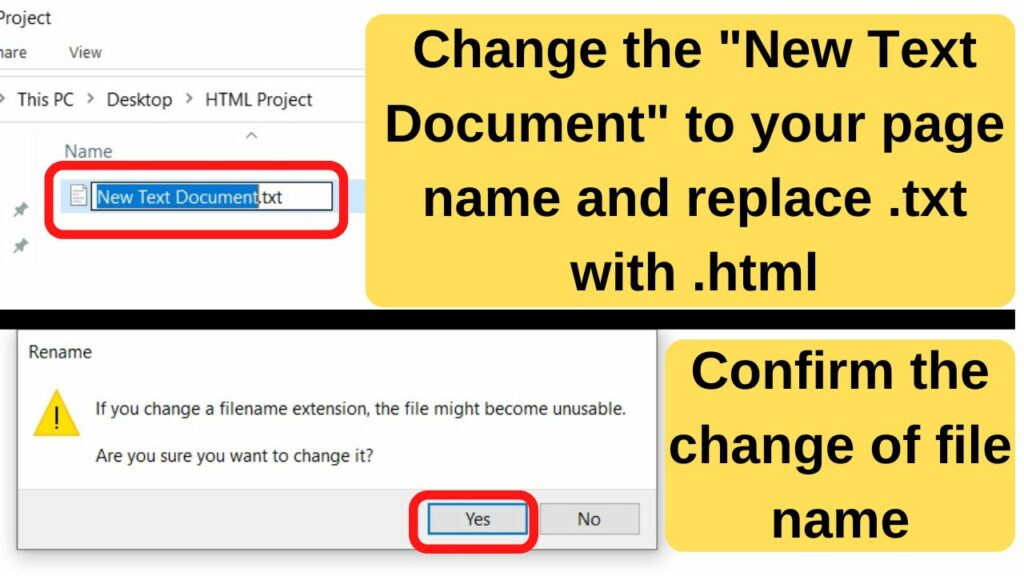
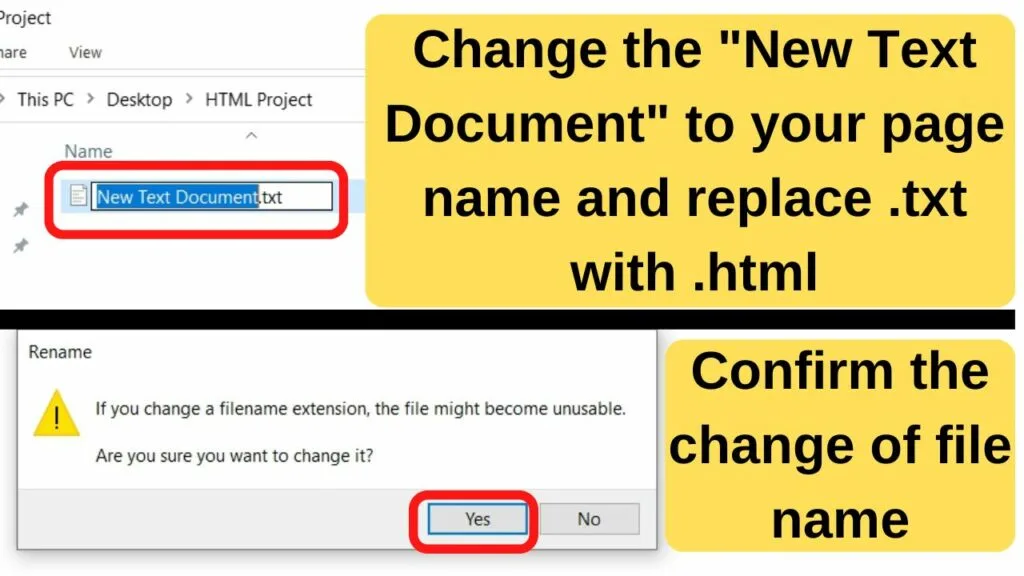
For each page, change the text “New Text Document.txt” to your page name with the .html instead of .txt.
You may be shown a warning that the file can become unusable if you proceed with changing the filename extension.
Click on Yes.
Once the file extension has been changed, you will see the notepad icon change to the browser icon.
The file type you want to be using when creating new HTML pages is Text Document, however, those open in a text editor and not your browser.
It is also possible to save a Word document as HTML, but much of the markup will be a mess. You can save yourself the hassle of cleaning complex codes by starting with plain text files.
The file name you give to the files will become part of the web address (URL) to open the page in a browser.
The best practice for naming pages is to name the file the same as your page name.
As an example, the about-us page would be saved as about-us.html. When the page goes live, the URL address would look like yoursitename[.]com/about-us.html
Step 4: Open each page in a plain text or source-code editor
If you have been following along and fast-tracked your HTML page creation with blank templates, now is a good time to add a template.
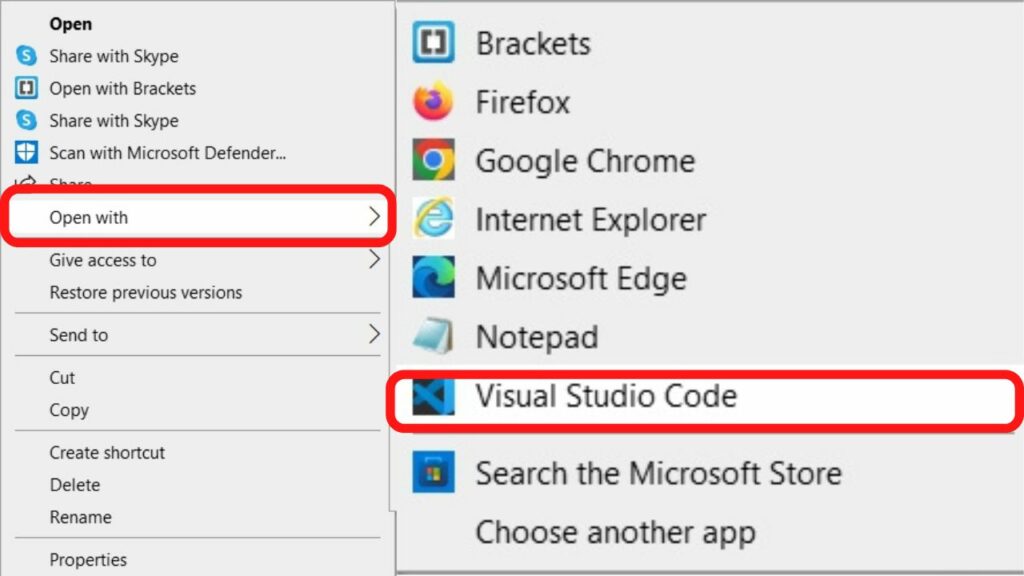
For this, you can either copy and paste an html5 boilerplate template into a plain text editor, or use a code editor such as Visual Studio Code, or Brackets.
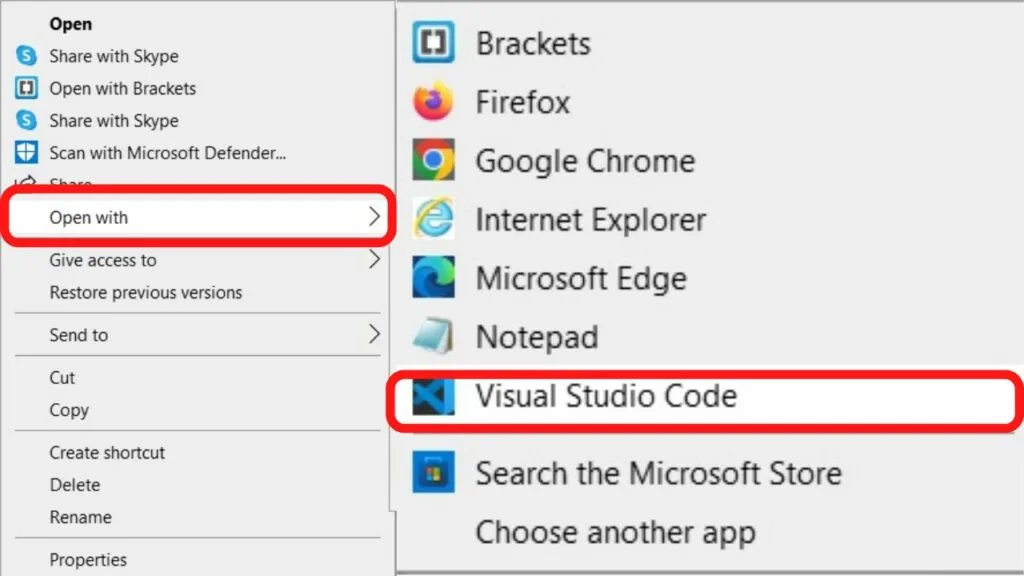
Whichever programs you have installed on your system, when you right-click to open a HTML file, you will be prompted to select which program to use, unless you have already set a default.
Double-clicking to open an html file will open it in your browser. That is no good for editing. You need to select an editing program to edit an html document. The options are displayed in the context (right-click) menu.
Open the file in a plain or source code editor, then copy and paste the following boiler plate template code:
|
1 2 3 4 5 6 7 8 9 10 11 12 13 14 15 16 17 18 19 20 21 22 23 24 25 |
<!DOCTYPE html> <html lang="en"> <head> <meta charset="UTF-8"> <meta http-equiv="X-UA-Compatible" content="IE=edge"> <meta name="viewport" content="width=device-width, initial-scale=1.0"> <title>Document</title> </head> <style> </style> <body> </body> </html> |
Do this for each page you have created, and change the title attribute to the page name that you want to use.
If you are using a source code editor, you may have the option to bulk edit your HTML pages by opening the folder that was made at step 1.
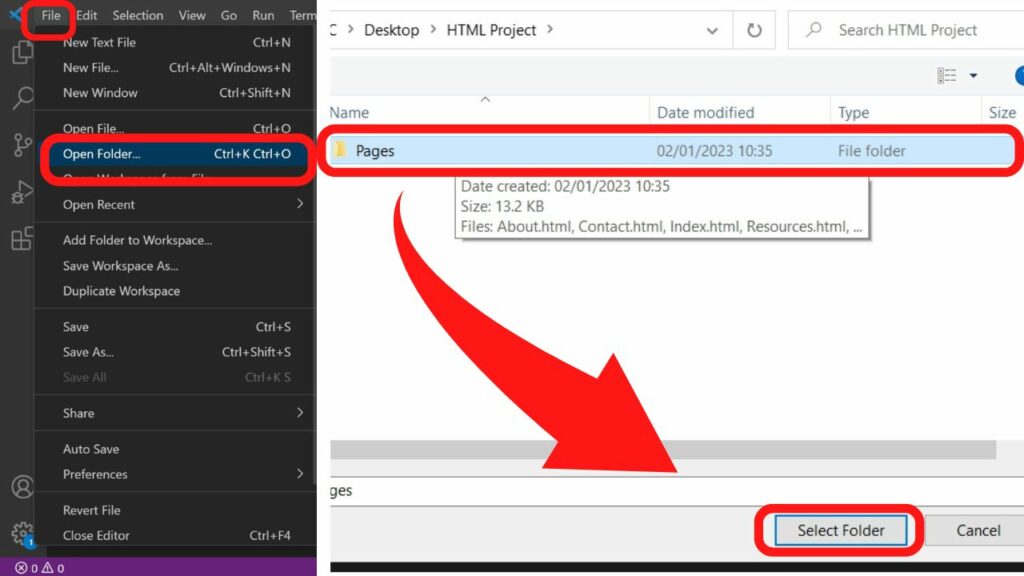
In Visual Studio Code, click on “file” then select “open folder”.
Navigate to the folder with your HTML pages and click on “Select folder”. That will open all of your HTML pages in the project within the VS Code Editor.
Step 5: Link all of your pages together in a navigation menu

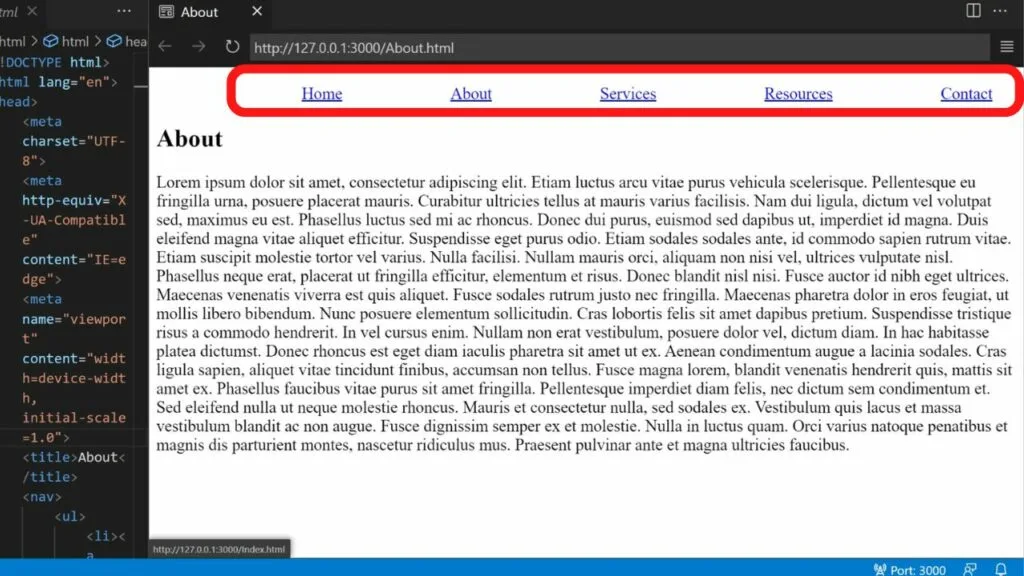
All multipage HTML websites require some way for users to navigate between different pages. The simplest, and most user-friendly method is to create a navigation bar. Users are familiar with these.
For the purposes of HTML markup, add your navigation menu within a nav tag.
|
1 |
<nav> |
Next is to create a list of pages to include in the navigation menu and display them as a list.
- Create an unordered list.
|
1 |
<ul> |
This will create a list with bullet points and stack them vertically.
- Add each page as a list item.
|
1 |
<li> |
The li tag is used for each list item, in this case, for each page being included in the navigation menu.
- Add the anchor tag
|
1 |
<a href> |
The anchor attribute is used to make text clickable in your navigation menu. Otherwise, it will not function, instead only displaying the text.
The href in html markup stands for hypertext reference and it will be what points to the destination folder for browsers to find and load your HTML page.
Add a new list item for every page that you want to include in your navigation menu.
What you should have will look similar to the list below
|
1 2 3 4 5 6 7 8 9 |
<nav> <ul> <li><a href="Index.html">Home</a></li> <li><a href="About.html">About</a></li> <li><a href="Services.html">Services</a></li> <li><a href="Resources.html">Resources</a></li> <li><a href="Contact.html">Contact</a></li> </ul> </nav> |
With the navigation section complete, the above nav container can be added to the head section of each HTML page.
|
1 2 3 4 5 6 7 8 9 10 11 12 13 14 15 16 17 18 |
<!DOCTYPE html> <html lang="en"> <head> <meta charset="UTF-8"> <meta http-equiv="X-UA-Compatible" content="IE=edge"> <meta name="viewport" content="width=device-width, initial-scale=1.0"> <title>Contact</title> <nav> <ul> <li><a href="Index.html">Home</a></li> <li><a href="About.html">About</a></li> <li><a href="Services.html">Services</a></li> <li><a href="Resources.html">Resources</a></li> <li><a href="Contact.html">Contact</a></li> </ul> </nav> </head> |
Optional: Style the navigation menu with CSS
The above list can be left as is, however, navigation menus are usually displayed on a horizontal bar, rather than a vertical bullet point list. This change is done by adding CSS to the style tags of the HTML document.
HTML is used to markup the document. CSS is used for styling.
Two simple adjustments that will show your list as a row and with spacing between each link are the following:
|
1 2 3 4 5 |
nav ul { list-style: none; } |
Using the list-style: none; code removes the bullet points from an unordered list within the navigation section.
|
1 2 3 4 5 6 7 |
nav li { display: inline-block; margin-left: 100px; } |
Displaying the navigation list items (nav li) as an inline block shows each list item as a row instead of a stacked list of items.
Setting the margin-left to 100px (or any other unit) will create space between each list item in the navigation menu rather than having them bunched together.
From there, you can add various CSS attributes to design your navigation bar, such as background colors, fonts, sizing, link hover colors and so on.
The most important part of the nav menu is that the links are clickable, otherwise, the list items will be useless for navigating between multiple HTML pages.